Up one level (nRF51822)
How to develop for nRF51822 on the Linux command line using GCC (nRF51 series)
Note: This article is perhaps a bit outdated. See Ole Morten's comment on the bottom of this page
This tutorial tells you how to compile programs and program the flash of the nRF51822 on the evaluation kit board by Nordic Semiconductor in a Linux environment. It is assumed that you have purchased the "nRF51822 Evaluation Kit" (http://www.mouser.com/ProductDetail/Nordic-Semiconductor/nRF51822-EK/?qs=sGAEpiMZZMvQuebtxbmqHcwahSg6lJax). You basically need to download three things: The debugger driver, a GCC compiler with ARM Cortex support and the nRF518 SDK. There are 4 steps in this tutorial and it should be pretty straightforward.
Note: This article is perhaps a bit outdated. See Ole Morten's comment on the bottom of this page
If you are using Ubuntu or Debian, you may consider looking at this page.
- Download the J-link software from Segger: http://www.segger.com/jlink-software.html?step=1&file=JLinkLinux_462a. This is a .tgz file that it should be easy to decompress with "tar". The evaluation kit uses a debugger from Segger and this is why you need to download this. You will have to enter the serial number of the Segger chip (on the evaluation kit) in order to download this file. After installing, run these commands from the directory where you have saved the file (assuming you download version 462a. Newer versions may work as well):
tar -xvf JLink_Linux_V462a.tgz
cd JLink_Linux_V462a
sudo cp 45-jlink.rules /etc/udev/rules.d/
cd ..
sudo mv JLink_Linux_V462a /opt/
After running these commands you should unplug and plug in the evaluation kit. The "45-jlink.rules" file ensures that you can program the nRF51822 as a non-root user also (as long as the user is a member of the group "plugdev").
- Download the Sourcery Codebench Lite Edition by Mentor: http://www.mentor.com/embedded-software/sourcery-tools/sourcery-codebench/editions/lite-edition/request?id=e023fac2-e611-476b-a702-90eabb2aeca8&downloadlite=scblite2012&fmpath=/embedded-software/sourcery-tools/sourcery-codebench/editions/lite-edition/form. Make sure you choose the "EABI Release" and not the "GNU/Linux Release" (the link should guide you to the correct one). You will have to register your email address to download this file. Choose the "IA32 GNU/Linux TAR"-package after you have followed the link that is sent to you by email. This is a compiled version of GCC that works with the ARM Cortex processors. It is distributed as a .tar.bz2 file that you can easily decompress with tar (you might also use a newer version than the one assumed by the commands below):
tar -xvf arm-2012.09-63-arm-none-eabi-i686-pc-linux-gnu.tar.bz2
sudo mv arm-2012.09 /opt/
The GCC version installed by default in for instance Ubuntu does not support ARM Cortex. It is possible to compile GCC yourself so that it supports ARM Cortex, but the easiest is by far to download the version from Mentor as explained above.
You should use this version of GCC instead now: https://launchpad.net/gcc-arm-embedded
- Download the nRF518 SDK: Go to http://www.nordicsemi.com/. Register a new user. Register a new product and enter the serial number of the evaluation kit. Follow this link: http://www.nordicsemi.com/eng/Products/Bluetooth-R-low-energy/nRF51822-Evaluation-Kit. Click the "Downloads"-tab and download the nRF518-SDK. This is an .msi file which is intended to be used on Windows. However, if you have WINE, it is pretty straightforward to install it on Linux also:
wine msiexec /i nrf51_sdk_v4_0_1.22983.msi
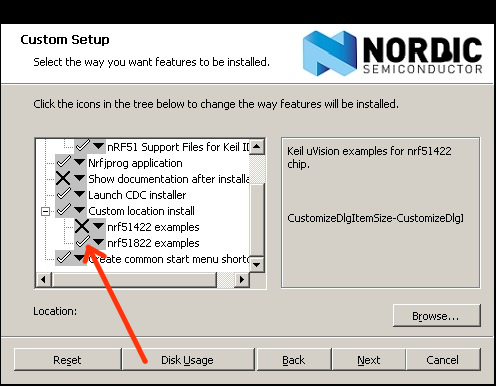
IMPORTANT!: Make sure that you select that you want to install "nrf51822 examples" (Install feature locally) when you are in the "Custom Setup" menu:
Just click cancel when it asks to install the JLink OB CDC Driver Package.
After the installation, you will end up with the directory: "/home/$(your user)/.wine/drive_c/Nordic Semiconductor/nRF51 SDK_v4.0.1.22983". To make everything a bit easier, this one should be moved to another place. (It is also an advantage if you get rid of the filename spaces!!):
sudo mv "/home/$(your user)/.wine/drive_c/Nordic Semiconductor/nRF51 SDK_v4.0.1.22983" /opt/nrf51sdk
You should be able to find a zip-file instead now on the web site called something like nRF518-SDK-ZIP. This one should be extracted somewhere convenient like /opt/nrf51sdk.
- Now you have downloaded all the files you need and are ready to start developing! In order to compile a simple program to be downloaded to the nRF51822, you need a couple of things from the SDK:
- The assembly startup file:
/opt/nrf51sdk/Nordic/nrf51822/Source/templates/gcc/gcc_startup_nrf51.s
- The linker script:
/opt/nrf51sdk/Nordic/nrf51822/Source/templates/gcc/gcc_linker_script_nrf51.ld
- The system_nrf51.c-file:
/opt/nrf51sdk/Nordic/nrf51822/Source/templates/system_nrf51.c
- Some header files: (/opt/nrf51sdk/Nordic/nrf51822/Include/)
- nrf.h
- nrf51.h
- nrf51_bitfields.h
- nrf51_deprecated.h
- nrf_gpio.h
- gcc/core_cm0.h
- gcc/core_cmFunc.h
- gcc/core_cmInstr.h
- system_nrf51.h
- compiler_abstraction.h
- boards.h
- boards/pca10001.h
- One "Makefile"
You do not need to copy these files from where they are. It will suffice to create a Makefile that points to the correct location. Below is a basic Makefile that contains only the necessary things in order to compile the .bin or .hex file needed to program the flash. You can also find an example Makefile under /opt/nrf51sdk/Nordic/nrf51822/Source/templates/gcc which is more generic but perhaps a bit harder to understand.
CC          := /opt/arm-2012.09/bin/arm-none-eabi-gcc
OBJCOPY     := /opt/arm-2012.09/bin/arm-none-eabi-objcopy
NRF51_SDK   := /opt/nrf51sdk

default: main.bin main.hex

main.o: main.c
	$(CC) -mcpu=cortex-m0 -mthumb -DBOARD_PCA10001 -DNRF51 -I$(NRF51_SDK)/Nordic/nrf51822/Include -I$(NRF51_SDK)/Nordic/nrf51822/Include/gcc -c $<

system_nrf51.o: $(NRF51_SDK)/Nordic/nrf51822/Source/templates/system_nrf51.c
	$(CC) -mcpu=cortex-m0 -mthumb -DBOARD_PCA10001 -DNRF51 -I$(NRF51_SDK)/Nordic/nrf51822/Include -I$(NRF51_SDK)/Nordic/nrf51822/Include/gcc -c $<

nrf_delay.o: $(NRF51_SDK)/Nordic/nrf51822/Source/nrf_delay/nrf_delay.c
	$(CC) -mcpu=cortex-m0 -mthumb -DBOARD_PCA10001 -DNRF51 -I$(NRF51_SDK)/Nordic/nrf51822/Include -I$(NRF51_SDK)/Nordic/nrf51822/Include/gcc -c $<

gcc_startup_nrf51.o: $(NRF51_SDK)/Nordic/nrf51822/Source/templates/gcc/gcc_startup_nrf51.s
	$(CC) -mcpu=cortex-m0 -mthumb -DBOARD_PCA10001 -DNRF51 -I$(NRF51_SDK)/Nordic/nrf51822/Include -I$(NRF51_SDK)/Nordic/nrf51822/Include/gcc -c $<

main.out: main.o system_nrf51.o nrf_delay.o gcc_startup_nrf51.o
	$(CC) -L"/opt/arm-2012.09/arm-none-eabi/lib/armv6-m" -L"/opt/arm-2012.09/lib/gcc/arm-none-eabi/4.7.2/armv6-m" -Xlinker -Map=main.map -mcpu=cortex-m0 -mthumb -mabi=aapcs -T$(NRF51_SDK)/Nordic/nrf51822/Source/templates/gcc/gcc_linker_script_nrf51.ld main.o system_nrf51.o nrf_delay.o gcc_startup_nrf51.o -o main.out

main.bin: main.out
	$(OBJCOPY) -O binary main.out main.bin

main.hex: main.out
	$(OBJCOPY) -O ihex main.out main.hex

install: main.bin
	sed  's#\[\[--filename--\]\]#$(PWD)/main.bin#' segger/burn-template.seg > burn.seg
	./segger/segger.sh $(PWD)/burn.seg

clean:
	rm *.o *.out *.hex *.seg
This is a simple main.c which will make the two LEDs flash:
#include "nrf_delay.h"
#include "nrf_gpio.h"


int main(void){
	nrf_gpio_range_cfg_output(18,19);
	while(1){
		nrf_gpio_port_write(2,8);
		nrf_delay_ms(80);
		nrf_gpio_port_write(2,4);
		nrf_delay_ms(80);
	}

}
Download a simple .tar.gz project here: simple-nrf51822-linux.tar.gz. This contains the main.c file above, the Makefile and the Segger-scripts for programming the flash. In addition to the files mentioned above, this project uses the functions from nrf_delay.c and you can see in the Makefile above that "nrf_delay.c" is also compiled.
File content:
simple-nrf51822-linux
├── main.c
├── Makefile
└── segger
    ├── burn-template.seg
    └── segger.sh
Simply write:
tar -xvf simple-nrf51822-linux.tar.gz
cd simple-nrf51822-linux
make install
while the evaluation kit is connected to the USB port, and the flash of the nRF51822 should be programmed and the LEDs should start flashing.
Note! For some reason the Makefile will report that an error has occured after programming the flash. This does actually not mean that the programming has failed (if the LEDs have started flashing). You may also have to modify the path for the Segger-driver installation in the segger/segger.sh file.
The next step now will be to modify the "main.c" file according to your wishes and recompile with "make install" and then see if the changes are reflected by the nRF51822!
Please let me know in the comment field below if this tutorial worked for you or if you experienced any problems!
You may now continue to the tutorial on how to program the BLE soft device from Linux: Part 2 -->.
References:
Erase the flash:
In order to erase the flash content, start StartJLinkExe.sh (you can start it with ./segger/segger.sh from the "simple-nrf51822-linux" project directory) and execute these commands:
w4 4001e504 2
w4 4001e50c 1
w4 4001e514 1
r
You do not have to erase the flash before every time you program above. However, this must be done if for instance the Bluetooth low energy Soft-device has been programmed onto the chip and you want to remove it. |
|
|
